Family portrait and fine art photography based in Chilliwack BC Canada
ChrisTopher Films
  • Home
  • About Me
  • Gallery
    • Special Occasions >
      • Coralee & Peter Wedding
      • Alanna & Les Engagement
    • Family Portraits >
      • The F Family
      • The L Family
      • The M Family
      • The W Family
    • Landscapes >
      • Sunset
      • Nature
      • Water
      • Ice
    • Performers >
      • Ron Boudreau
      • KAT
    • Public Events >
      • Chilliwack Flight Fest 2013
      • Abbotsford Airshow
      • Chilliwack Flight Fest 2014
    • People
  • Restorations
  • Contact Us
  • Prices
    • Photo Sessions
    • Restoration Fees
  • Blog

Announcing the engagement of Alanna and Les

12/4/2014

0 Comments

 
Just wanted to take a quick minute and post some photos from an engagement shoot I did last week. As the Christmas song says "Oh the weather outside was frightful" -4 Celsius and these two kept laughing and playing right up till dark.


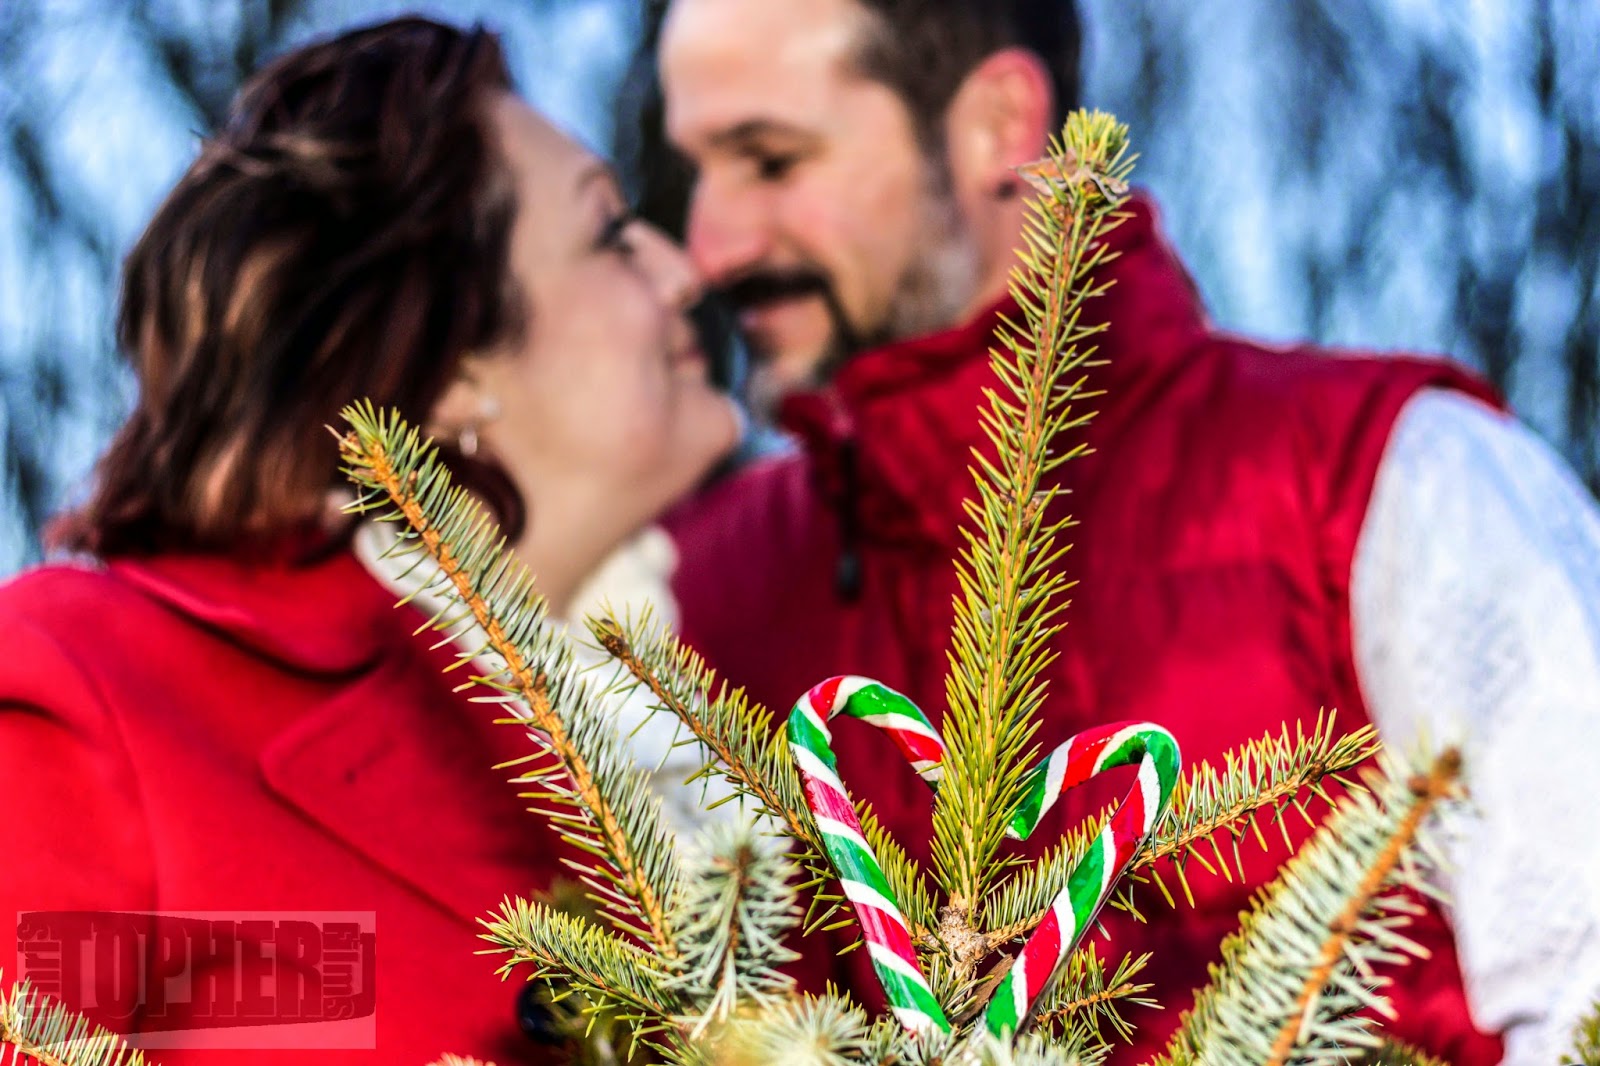
I thought it a nice touch given the cold to have a little nose kiss with the love heart in the Christmas tree


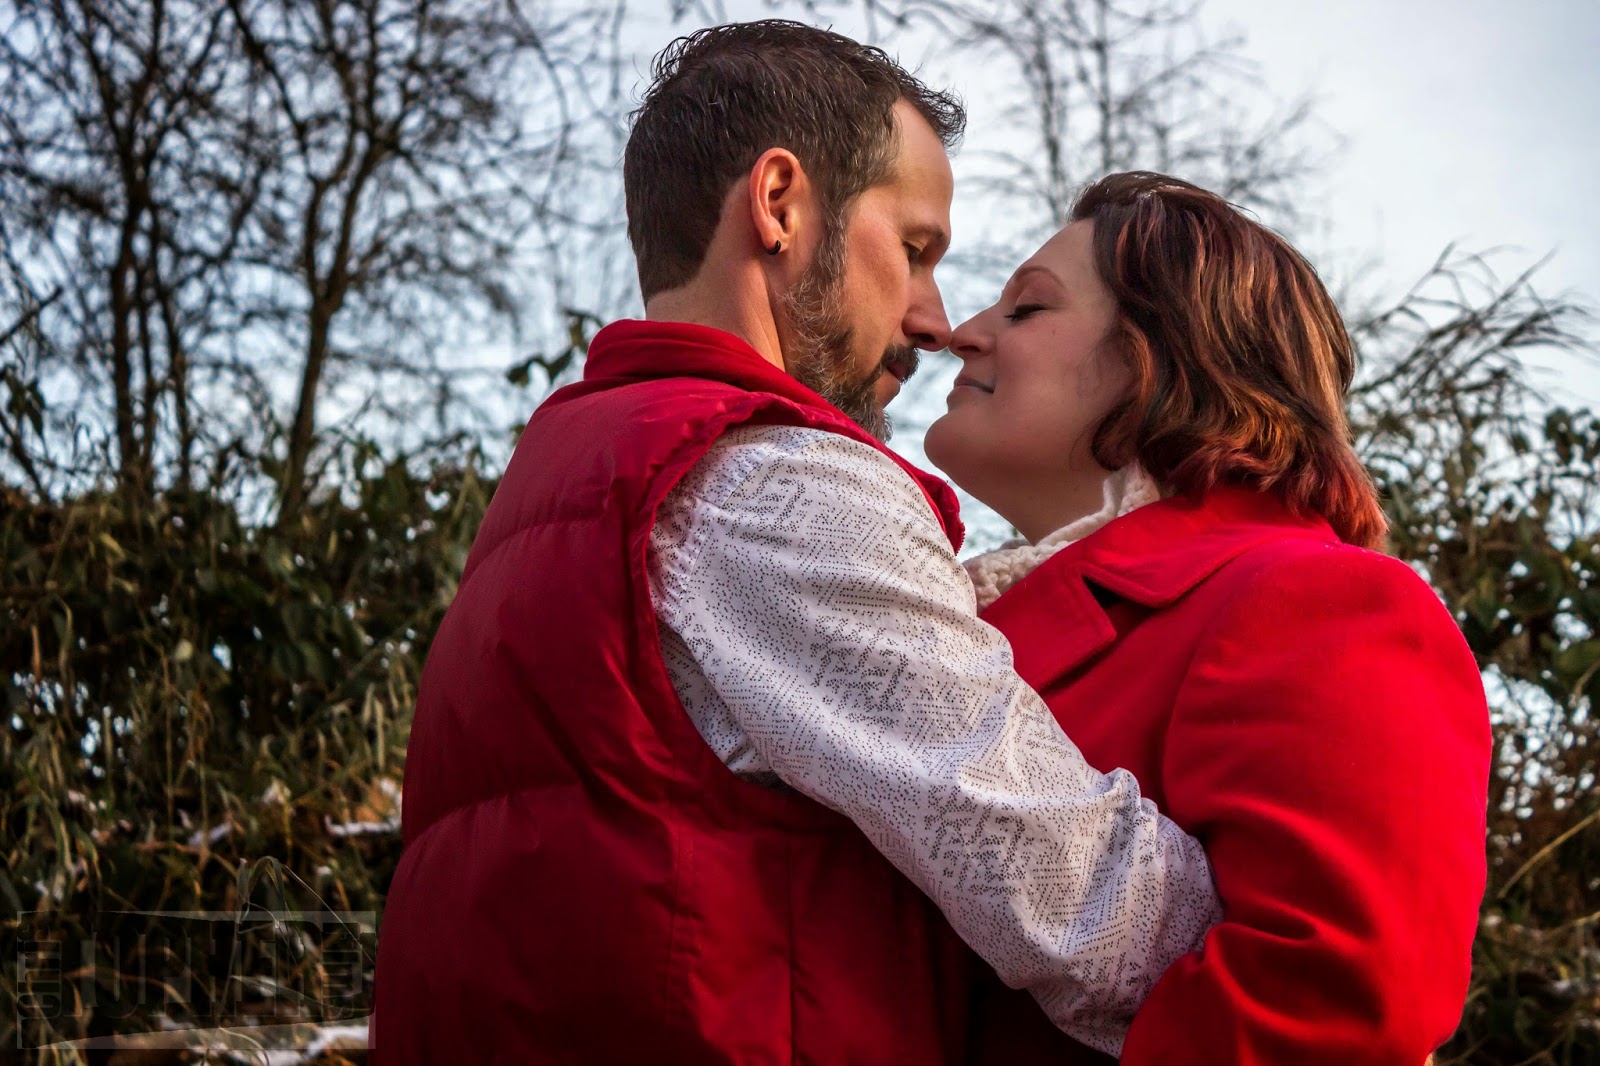
Nose kisses were the order of the day


These two show the love they have for each other in every smile. Such a perfect couple.


Thank you Alanna and Les for allowing me to share in this special day and I look forward to the wedding in just a few short weeks
0 Comments

Photoshop Tutorial

11/19/2014

1 Comment

 
It is amazing how photographers will take a photo and shelve it based on small little errors when in reality you can use editing software to create something wonderful that makes your subject truly stand out. In this blog I will do my best to give you a blow by blow blog about a Photoshop edit from a recent photo I created.

This photo was taken at recent shoot I did for a city council hopeful and the venue was amazing. I want to first thankThe Royal Hotel for allowing me to shoot in their lobby. I am really looking forward to going back there to capture more photos. I would also like to thank my subject Menu who is a super lady and a whole lot of fun. Now onto the edit.


This first photo is the original shot. I have said it before and will again a great edit starts from a great photo and I really like how this turned out. It has all the sharpness I need, the skin tones are nice and even and there is an interest that has been captured. That being said there are some negatives about it as well. I find the leaves dangling in front of the window very distracting, I don't like the sign poking out from her shoulder and lastly the phone cord drives me nuts. Finally there will be a little enhancing of Menu's already perfect smile and hair. Let's get into it.


Whenever I am editing a photo I always change what I dislike the most so for this photo I didn't like how contrasty it was. When this photo was shot I was using a flash with a 6x8 inch soft box which mounts to my speedlight. Even with the flash I still shot quite high ISO so the flash did not have to fill in so much light as to make the photo overly bright.

Step 1 the first thing I did was soften it a bit with a bit of noise reduction.

Step 2 was to bump up the exposure about 1 stop of light; it was just a bit dark but still had so much detail in the highlights and lowlights.

Step 3 was to replace the window I had a photo of this window in my catalogue of stock photos and I thought this would dramatize the photo just a bit more. Replacing the window is just a matter of cutting it from the original pasting into this photo and blending to make it look right.

Step 4 I used the clone tool to remove the phone cord

Step 5 grab the brush tool, sample the colour of her lips and "fix her lipstick" Now this step could have been done before the shot was taken but it was spur of the moment and neither of us thought about the fact her makeup was fading that late into the evening.

Step 6 is perhaps the most important. I used levels to brighten the photo and then with a layer mask I blocked out the section I didn't want brighter. What that equates to is just highlighting her hair and face.

That is pretty much it, now some purists will say that I changed the photo and they are not wrong. What they will fail to recognise is that I could have done the same things in a darkroom with film and hours upon hours of dodging and burning. Photos have always been manipulated to one degree or another and even the most amazing photographers in the world spend time cleaning up irritations in their photos. The difference between film and digital is time. What I can do now in my post editing software is instant, whereas what I did in film could take hours if not days.

Anyway here is the after post photo. As I said before, this photo had all the elements of a good photo to start with; I just perked it up a little. Hope you enjoy and please comment below and like my Facebook page to follow everything I do.


1 Comment

New Shots From Chilliwack

10/7/2014

0 Comments

 
The Fraser Valley is truly a remarkable place to live. Every day can be an inspiration to go out and shoot. Today I had the opportunity to wander about with a very good friend and fellow photographer Walter. Here are a few of the shots I'm sharing tonight.


Over the next couple of posts I will do tutorial style from camera to post.

Stay Tuned.

0 Comments

Sardis Digital Clickers

7/31/2014

0 Comments

 
I have had a lot of time consumed lately with a new project. Coming in September I will be facilitating a camera club/learning program. Meeting the third Tuesday of every month at Sardis Library, in my home town of Chilliwack BC, we will have fun learning and exploring all aspect of photography.

http://www.fvrl.bc.ca/programs.php?programType=All&fromDate=&status=1&programSearch=Search+for+Programs&library=Sardis&toDate=

So if you want to learn more about how to capture great moments, or some editing techniques, or just want to help others please come down and check it out. Oh and don't forget your coffee/tea and your camera.

For now I will leave you with an image I shot 3 years ago. It was quite dull and bland until I found a mask technique called luminosity masking. Pretty powerful editing style.
Vancouver Skyline

Hope you like it.
0 Comments

A New Restoration

5/21/2014

1 Comment

 
Hey everybody. Sorry I have been off again as of late. Things have been super hectic, but I wanted to just stop by and post a couple of words and showcase some of my latest restoration work. Feel free to read on about some exciting upcoming things for ChrisTopher Films.

But first. Here are a series of photo restorations I have been contracted to fix. You need to have a passion for this kind of work cause you will never get rich doing it, but the rewards of seeing your clients eyes sparkle with a tear, are sometimes the best reward.


 Take for example this photo from last year that some of you may have seen in A Guide to Restoration also seen on this blog.


This photo had a value to the client that was so big and she had been told by several other restoration outlets it was impossible to restore. She wasn't looking for a high res digital photo; she just wanted to see her children when they were babies again.


Now this next photo was entirely different. Look very closely at the banner and you will see the photo was taken in 1901. This client entrusted to me, over anybody else, a photo that is 113 years old. Every time I moved it I had to ensure it remained rigid and flat as it was crumbling, soon to be lost forever. Now it can be printed over and over again.


Finally my latest which I have had for quite some time. I know nothing about the photo or the family who it will go to. It is a gift from one friend to another and I truly hope they like it.


Oh and the big news. Starting in September I will be hosting with support from Sardis Public Library and Fraser Valley Regional Library a new drop in camera club. My goal is to do in person what my attempts are to do on this blog, learn and educate from and for likeminded photographers in Chilliwack and the Fraser Valley
1 Comment

Number One Reason Not to Throw Away

4/27/2014

0 Comments

 
Sometimes when you take a photo and look at it there is no feeling, no emotion. The photo just falls flat and dull. Throw it away. That's it save some room on your hard drive and DELETE. OMG did I just say that. What I really meant was keep it, save it, cherish it, and look at it at a different time. Today I will show exactly what I mean. I took a photo that was that dull, delete photo but looking at it later I found a surprise in that photo. That never would happen if I just hit delete. Read on to learn more.

Very often when you are out shooting you pop off a couple hundred photos. You know that there will be some jewels in that mix and you will see them right away. Others are blurry and out of focus and just not usable. Then there are the questionable photos. These photos are what I refer to as Facebook quality, standard snap shot. Nothing special. What if they are, can you see them in a different light?


Take this photo I shot recently. The performer is an amazing "Crooner"Ron Boudreau. I approached him about a month ago to take some photos of his performance and he invited me back to his latest show atChances Casino. After sifting through about 300 photos for the evening this one struck me as not bad, but not emotion evoking.


I scrolled through the photos a few times and this photo just kept calling me. I loved the expression on his face, the background has a quality of interest but too busy for the performer. It wanted something, so I sat for a long time and really looked at it. Since it was loaded into Lightroom I finally just started playing with some of the sliders and cropping.

First off let's minimize the back ground some and move the subject to the left third of the photo. Next we need to fix the exposure some and finally let's go black and white. Some photos just lend themselves to that one treatment. It's not something that should be used every time but that was exactly what this photo kept saying to me. It matched the performer, the location, and the lighting.


Here is the result and I don't think anyone would be disappointed in this.

And there it is folks. DO NOT throw away a photo that is on the border just sit quietly and let the photo tell you what it needs. Not every photo will but sometimes you will find that jewel in the rough

0 Comments

Focus Behind The Camera? Sure.

4/8/2014

2 Comments

 
Ever hear of back button focus? No? What is it? Is it important? Why would I use it? Answers to these questions and more will be answered in this week's blog. Read on for 100 reasons why back button photography is the way to go and how to set it up.


When you are composing a photograph you as the photographer have the ability to choose where your camera will focus. If you are using a canon you will most likely have nine different points to choose from and three different focus types. 


First let's address the focus types. The most common one to use is single shot. When using this mode you depress the shutter part way down your lens auto focus takes over and you press the shutter button all the way and presto a perfect photo:) The next option is AI focus. Much like single shot depress the shutter part way and the camera will auto focus on the point or points you have chosen. The nice thing with this mode is if you continue to depress the shutter part way and you subject moves you auto focus continues to track that subject and stay focused till you snap the shot. Last is AI Servo. In this mode your auto focus will track the subject constantly and even "learn" what it should be focusing on. Now this technology sounds amazing, and it is, until you start recomposing your shot and your camera tracks everything except the subject you want to shoot. Step in back button focus.

Through your camera menu settings you can disable the shutter button for focus and use one of the buttons on the back to focus with. Now you may ask yourself "why would I do that shutter focus is obviously the best way and that's why the camera company uses this default" right? Wrong. Camera companies use this feature because using a shutter button is normal practice and has been since cameras were invented, but remember the camera of our fathers and grandmothers did not have auto focus. Focus was gotten by turning a dial on the lens to bring the elements into alignment thereby achieving a crisp clean focus. Now with the flip of a switch and a press of a button a little red light appears in your view finder telling you the focus is perfect on your subject. So enough history, why use back button focus?


Look through your viewfinder at your subject, press your shutter part way down, look at the little red light in your viewfinder flash as your auto focus locks on to your subject, recompose, shoot. Now shot two. Look through your viewfinder at your subject, press your shutter part way down, look at the little red light. Get my point? This is very time consuming. Now change your camera to back button focus. Look through the viewfinder, press your back button, recompose and shoot. As long as your subject stays the same distance away from your lens you can recompose and shoot to your heart's content. This is the true beauty your shutter no longer has any use except what it should be for, activating the shutter, not focusing. If you choose to use your AI Servo mode you will find that again because it is independent of your shutter tracking your subject will be smoother and pressing your shutter button will be more fluid and controlled.


Anyway sorry for the lack of recent blogs. I hope you go out and try this new style of using your camera and as always I look forward to hearing your comments and getting your emails. Till next time.


2 Comments

Histo What

3/15/2014

1 Comment

 
Have you seen or heard of the histogram on your camera? Do you know what it is and when or how to use it? Is this an easy thing to learn and remember? Read on in this week's edition to find out the what, when, and why of using this very valuable tool on your camera.

When you take a picture using the LCD screen on your camera you see a LCD depiction of what that photo looks like. How often though do you look at it and say to yourself that photo looks amazing only to go home load it onto your computer and say what a bunch of crap. This photo is way too dark or light. This is when knowing how to read a histogram becomes so important.

Let's start with how to show the histogram on your LCD screen. On a canon camera when you choose view photo you can then press the info button on the back left hand side of the camera body. Nikon users will have to look it up in your manual but it should be similar. As you click through you see a variety of views from shutter count to RGB and then there is histogram view.

Now that you can see your histogram let's talk about what it is and how to read it. The histogram shows the tonal range of a photo. That is the dark, the light, and the neutral. On the left hand side is the dark or black, on the right hand side is the light or white, and the middle ground is the neutrals and grays. When you take your photo what you want to see is a nice balance over all three sections right? Wrong. This is where most articles confuse you and I will try to keep it simple.


Look at what you are shooting before you press the shutter. Consider what tonal ranges are in your photo. If you are shooting on a very bright day and a lot of the subject is white you will see a stacking like a spike on the right side of your histogram. If your subject is a full third black or very dark then the histogram will stack to the left. It's only when everything is kind of equal across the range you see a nice balance across the histogram.


You can see in these three examples exactly what I'm talking about. The top photo the range is fairly balanced with a small spike in the middle and a large spike on the right. The spike on the right is the "blown out" sky. Blown out refers to the loss of digital information. The sensor is so overwhelmed there is no information to read on that far side.


This photo represents the tonal mid-range. There are a few spikes and those would be the sparkle off the dress and the clouds.


Finally A photo with the histogram pressed heavily to the left. With all this black there is no information to read.


As you can see from the examples reading a histogram is not really that difficult. Look at your shot watching for what you expect the histogram to read like, really bright, really black, or neutral and then expose for that using aperture, shutter speed or ISO


1 Comment

A Question of Perspective

3/6/2014

2 Comments

 
Photographs can be very subjective. I slight change in crop, or a tilt of the camera can take the same subject and change the entire emotional feel of a photograph. Read this week's blog for some examples of this very thing.

A photo is the creation of an incredible moment. That moment might be happy, sad, thought provoking, or any other emotion you as the photographer would like to convey. But how exactly do you convey that message. It's all a question of perspective.


 Take for example the photo here. I feel like I'm being drawn in wanting to see what's around that little jog in the path. What wonders will I find in this overgrown greenery?


Now these two are interesting, the same model, and the same location two very different emotions. On the right the model is looking at something to his right. We don't know what it is but he is obviously curious about it. This opens up the viewer's mind to wonder what is interesting just out of view. Similar to the path above but no longer in the first person.


The photo below gives the feeling of sadness and depression. By shooting just above the subject and removing any reference of greenery, and focusing on the graffiti, we now have a sad depressed individual who we worry about.


There it is in a nut shell. A question of perspective. 3 photos, two of the same location and subject, but with entirely different emotions, feeling, and interpretations.


Let me know what you see and feel in the comment section below. I'm sure your perspective will be different than mine.
2 Comments

Destination Kelowna

2/24/2014

1 Comment

 
There is nothing like getting away and exploring a new environment. I had the opportunity recently to take my family away to Kelowna BC for BC's Family Day weekend. Read on to hear about some of the experiences we had, from places to stay and things to do.

Starting with our accommodations. We booked with Vacation By Owner which as of the third attempt was a great success. We stayed at Playa Del Sol in Kelowna's Mission District. Now I will say dealing with VRBO was somewhat trying and we did start our adventure off by thinking we had made a mistake. When I booked the first condo I received confirmation back very quickly and 2 days after providing the information required for a contract was informed that this unit had been double booked and was not actually available. The second attempt showed the unit as available but found out quickly it was not available either. I did consider giving up all together; however the other adventures we were looking forward to in Kelowna had already been booked as of the first confirmation.

Third time is the charm. We contacted the last person and new right away we were in the right place. The owner was professional, prompt and personable. The three P's are so important to me. We accepted the contract and were off to our Kelowna adventure.

The condo we rented was a lovely 2 bedrooms plus den, but the den had been converted to a third bedroom. The master had a king size bed and the other two rooms had queens. There was even a pull-out couch if you needed it.


Kitchen was well equipped with cookware enough to create some delightful dinners including eggs Benedict for breakfast, and my wife made tasty pineapple angel food cupcakes.


When in Kelowna in the winter no trip is complete without a trip to Big White Ski Village. We went up on the Saturday and were welcomed to fantastic interior BC powdery snow and crystal blue skies. One of my sons, an avid snowboarder, allowed me to capture this shot of his expertise. Now unfortunately I missed him face planting into the snow as he missed his landing, but exploiting what your kids give you is just part of the game.


We headed to The Bull Wheel for lunch. If you get up there the two absolute musts are the lobster chowder and the best wings I've ever eaten.


We ended the holiday in Kelowna with an exceptionally competitive round of mini golf or as my youngest calls it small golf.

So there it is. A holiday in a nut shell. Get out and enjoy your time with family, friends, or whoever. Life is always what you make it so make some memories today. Oh and try to photograph some of them too.
1 Comment
<<Previous

    RSS Feed

    Archives

    December 2014
    November 2014
    October 2014
    July 2014
    May 2014
    April 2014
    March 2014
    February 2014
    January 2014
    October 2013
    September 2013
    August 2013
    July 2013
    June 2013

Powered by Create your own unique website with customizable templates.